
 by
by 
Microsoft Endpoint Manager (MEM) AKA Intune, is a robust and capable MDM solution for Microsoft Windows based machines. MEM includes several configuration profiles that will benefit the end users of the organization. For example, Storage Sense. Storage Sense is a built-in maintenance feature of Windows 10 (think Disk Cleanup from Windows 7 and Older). Storage Sense is configured with a Configuration Profile in MEM. This article will look at how to configure Storage Sense for Windows using a Configuration profile in MEM (Intune).
DISCLAIMER
Please understand that the content herein is for informational purposes only. This existence and contents shall not create an obligation, liability or suggest a consultancy relationship. In further, such shall be considered as is without any express or implied warranties including, but not limited to express and implied warranties of merchantability, fitness for a particular purpose and non-infringement. There is no commitment about the content within the services that the specific functions of the services or its reliability, applicability or ability to meet your needs, whether unique or standard. Please be sure to test this process fully before deploying in ANY production capacity, and ensure you understand that you are doing so at your own risk.
Table of Contents
What is Storage Sense
How To Configure Storage Sense for Windows in MEM (Intune)
Conclusion
What is Storage Sense?
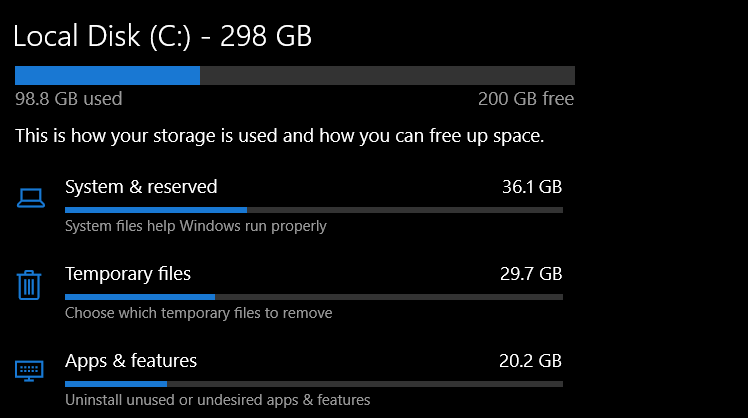
Storage Sense is a built-in maintenance feature of Windows 10 (think Disk Cleanup from Windows 7 and Older). It serves as a tool to keep your hard drive space free. It cleans up temp files, old downloads, and clears out your recycle bin. Windows needs a certain percentage (ideally 20% or greater) of the hard drive space to be “free” to maximize performance. If the free space on a hard drive falls below that, you will start to experience slowness on your computer.
Storage Sense gives users the ability to safely remove unnecessary files. If you are using OneDrive to protect your important folders, then Storage Sense also leverages the Files On Demand feature of OneDrive. This configuration can also reduce the number of calls the Help Desk will get about slow PC performance. Automation like this is a great way to maintain performance for Windows PC’s.
By now you want to know how you can automate this process so that it happens automatically. Right?!?! Lets do this!
How To Configure Storage Sense for Windows in MEM (Intune)
The goal of this is to have Storage Sense configured automatically for all users. Additionally, we want to automate its usage rather than rely on users to remember this process. Administrators can use MEM (Intune) to configure Storage Sense for Windows silently in the background, with minimal impact on productivity.
Create Configuration Profile
First, sign into Microsoft Endpoint Manager. From here, you will click on Devices –> Windows. Next you want to open Configuration Profiles and Create a new Profile. Then, choose Windows 10 as the Platform, and Settings Catalog as the type.

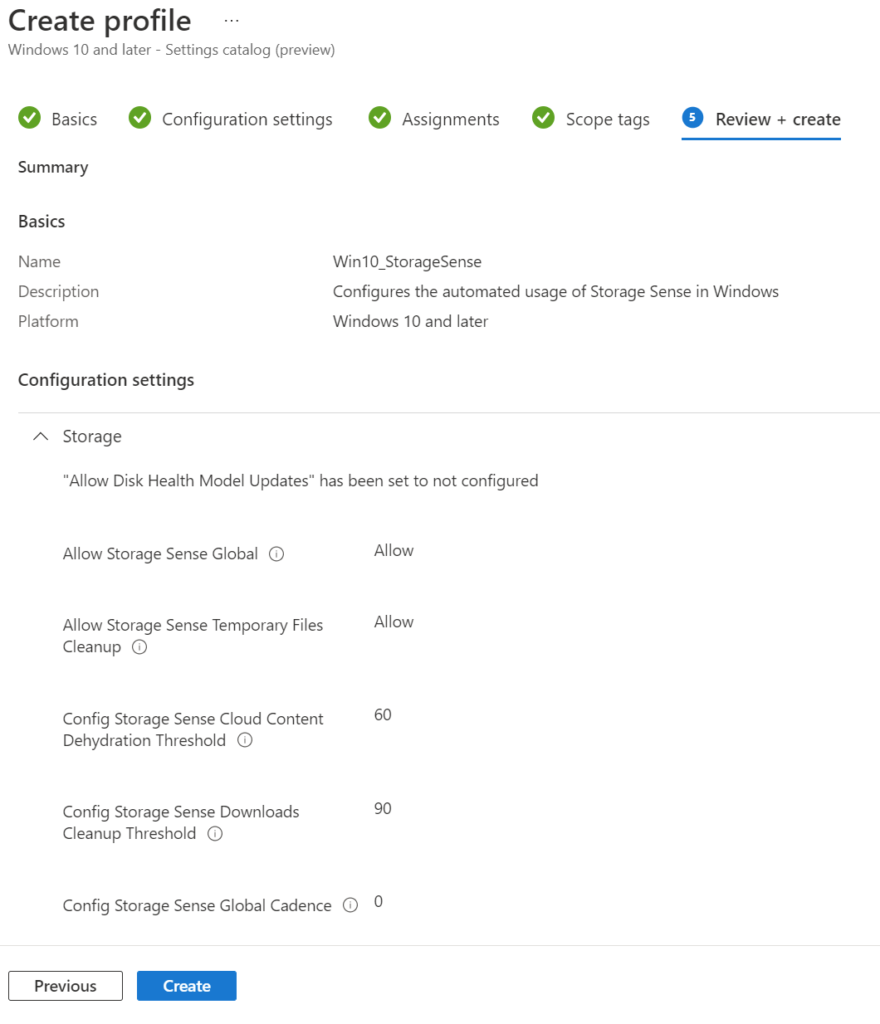
When you are on the first screen, create a title for the Configuration Profile (it helps to have a naming scheme). Also give a short description of what the policy does. This helps for 6 months down the road when you don’t remember why you have a policy.

Then, once you are in the Settings Catalog section, Choose “Add Settings”. From here scroll down the list (or search) for the “Storage” category. Add all settings in this group to start, then removing the ones that don’t apply as you go along.
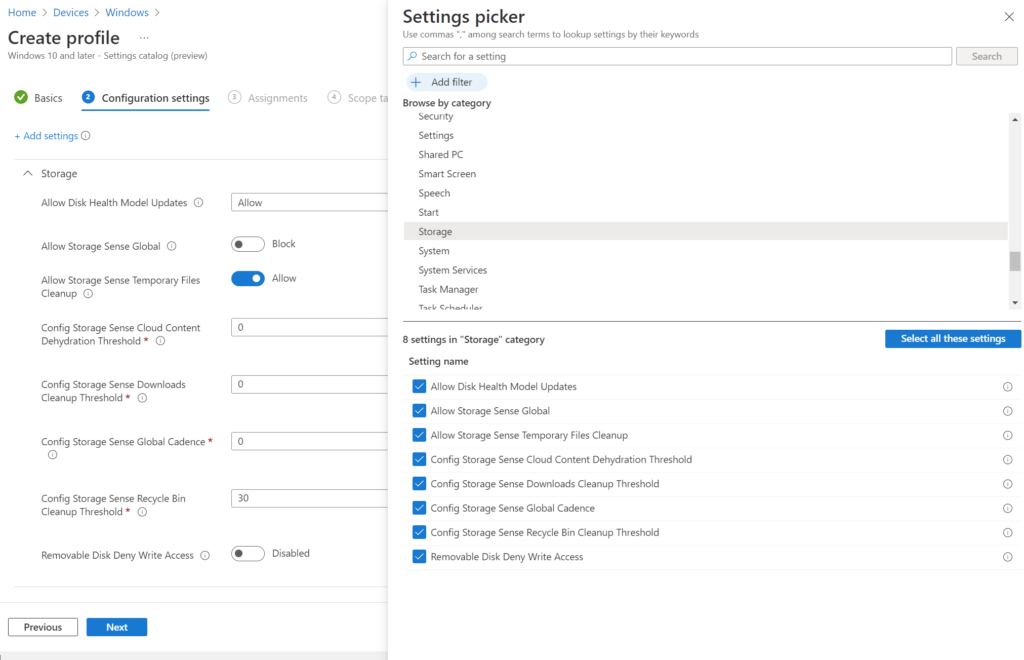
Next, remove “Allow Disk Health Model Updates” and “Removable Disk Deny Write Access” as these do not pertain to Storage Sense.

Settings Breakdown
- Allow Storage Sense Global – enabled the management of Storage Sense by the Organization. This must be set to “Allow” for the other settings to work.
- Allow Storage Sense Temporary Files Cleanup – Allows Storage sense to clean up temp files based on Microsoft’s recommended configuration. Set this to “Allow” as it is rarely if ever detrimental to delete old temp files
- Config Storage Sense Cloud Content Dehydration Threshold – This only matters if you are using OneDrive with Files on Demand.
- The dehydration threshold determines how long until files that haven’t been modified recently are moved to OneDrive only. This is measured in days. You can use 30 – 90 days depending on how aggressive you want Storage Sense to protect hard drive space.
- If you are not using OneDrive for this, you can remove this setting.
- Config Storage Sense Downloads Cleanup Threshold – Determines how long files can remain in the downloads folder before they are removed. It is best to let users know if you are turning this one on. However, most things that are in downloads are likely temporary anyways.
- Config Storage Sense Global Cadence – This determines how frequently Storage Sense will evaluate this things. These are the available options: (You only need to enter the number)
- 1 – Daily – Storage Sense will run daily
- 7 – Weekly – Storage Sense will run once a week
- 30 – Monthly – Storage Sense will run once a month
- 0 – As Needed – (Default) Storage Sense will run when Windows believes hard drive space is low.
- This is recommended for the least impact, as only those who will benefit from it will be effected. Configure this based on your needs.
- Config Storage Sense Recycle Bin Cleanup Threshold – How long items will live in the recycle bin before they are removed by Storage Sense.
Finalize and Test
Once you have this configured, it is time to save and deploy this policy to the test group. It is best practice to test out every policy on test group, even though this configuration profile is designed to have minimal impact on users. If nothing else, because you want to make sure it actually works. If you’ve ever had an someone yell at you for clearing their recycling bin on a support call, you know that its best to make sure this policy works the way it is intended.
Conclusion
That is all there is to it! You now understand how to configure Storage Sense for Windows with a configuration profile in MEM (Intune). Policies like this can go a long way to help with the performance of machines for the end users in your organization, with minimal downside. This is advantageous if you are looking to reduce calls at the Help Desk, improve individual PC performance, or just get a Quick Win in a sea of never ending projects. I hope this worked for you, and that you find this useful.
Hit me up on Twitter @SeeSmittyIT to let me know what you thought of this post. Thanks for reading!